Every year we make an extra special point of letting our neighbors know just how much we appreciate them. So tonight as a family we visited our neighbors bearing gifts and tydings of great joy! We had so much fun as they came to the door and we rang out together "Merry Christmas". To see their faces light up with surprise was priceless. The kids were so excited and I think the message of it being more of a blessing to give then to receive was learned.

Monday, December 19, 2011


Saturday, December 17, 2011
Day 10: Graham Cracker Gingerbread House and Nativity
When I came across this little idea, I thought I would put a new twist on my traditional gingerbread house that we make from graham crackers and give this little project a try. This one is sure to please everyone! Aren't the sheep cute! Click on the link below each picture to get the instructions. FYI the store kits are fun to!
 |
Graham Cracker Nativity |
Day 9: Origami Wreath
I have always loved origami. I will never forget the year one of my parents made me a bouquet of paper origami flowers. It was absolutely BEAUTIFUL! Today's craft is a beautiful Origami Wreath.
Since I am learning this art form myself, I am sending you all to Sandy's Space where she has a very detailed tutorial for you to follow. She is really talented! I was thinking..(uh oh)..wouldn't this pretty little wreath look nice in any paper that coordinates in your home.. leaning up against a picture frame, or on a bookshelf ? Just decorating out loud !(Big SMILE)
Happy Crafting,
Sharmin
 |
| Origami Wreath |
Day 8: Paper Flower Ornaments
This project is for those of you with school age kiddos. I needed to do some new stuff with my older two so here's a project that I have up my sleeve to complete with them this week. Wouldn't these look pretty attached to a present?
Please go to How About Orange for the tutorial to make these. They look really complicated but they are super easy. I was also thinking that even though you may have a preschooler they would probably enjoy making the pattern ones. You can have them tell you which color comes next in the pattern. Always finding a teachable moment!
Sharmin
 |
| Paper flower ornament |
Sharmin
Day 7: Baby Jesus in A Manger

Over the past 2 weeks we have been talking about the true meaning of Christmas. In "Mommy Preschool" Lillian and I made this precious ornament. It is really fun and easy to do.
Supplies:
card board tube (toilet paper roll cut in half lengthwise)
white material or cotton (I used a piece of felt)
yarn or straw (hay)
wooden round ball or a piece of construction paper for face
glue
marker
How to make this project:
- Glue paper towel rolls back to back to form manger.
- Clamp with finger or clothespin to hold together until dry.
- Cut yarn to length of manger and glue yarn inside of manger.
- Fold piece of fabric to resemble a blanket and glue to manger.
- Draw face on wooden ball or paper and attach to fabric with.
- Lay Baby Jesus in tree.
Day 6: Handprint Christmas Tree Keepsake
 |
| Handprint Tree |
This adorable craft is one of my favorites to do with my kiddos. Right now Hannah and Stephen's handprint wreaths grace the walls of our playroom. This project makes a great keepsake and present for grandparent's. Head on over to Our Lil' Kingdom for a tutorial.
Monday, December 12, 2011
Day 5: Picture Tile Craft
Okay, if you are still trying to find the perfect gift to give to grandparents or family members, I think this one may be for you. I love this craft because it is inexpensive, personal, and super cute! I've had this one on my list to do for


Supplies you will need:
- White tile (the one in the picture above is 4.5x 4.5). You can use any size tile that you like.
- Picture or design that you want to use. It should be cut slightly smaller than the tile.
- Modge Podge. You can use glossy or matte.
Directions:
- Print out and trim photos. Photos work best when printed on photo paper. They won't smear when you use the Modge Podge.
- Paint a thin layer of modge podge on the tile and place the photo on top of the tile. Let dry for about 5 minutes. It should not be sticky when you touch it.
- Add another layer of modge podge to the top of the photo and let it dry completely.
Saturday, December 10, 2011
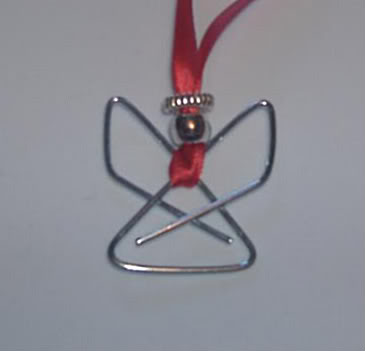
Day 4: Paper clip angel
Today Hannah is guest posting her pick for today's craft. Take it away Hannah...
This pretty angel necklace is great for a present . I hope you like it!
"Hark the herald angels sing,Glory to the newborn King".

Materials:
Special Paperclips called small ideal clamps.
Sliver Pony Beads or any color pony bead you like
Silver Disk Beads (preferably with fluted or beaded edges)
Ribbon
Directions:
This pretty angel necklace is great for a present . I hope you like it!
"Hark the herald angels sing,Glory to the newborn King".
Materials:
Special Paperclips called small ideal clamps.
Sliver Pony Beads or any color pony bead you like
Silver Disk Beads (preferably with fluted or beaded edges)
Ribbon
Directions:
- Take the ribbon and tie in a loop. Thread a disk and then a pony bead onto the ribbon and push up to the knot. Loop the ribbon through the clip and then through itself (see picture) slip both beads back down to sit flush with the clip.
- Tie ribbon at top to make necklace.
- Ta Da! You are done.

Friday, December 9, 2011
Day 3: Reindeer Ornament
Here is a super easy craft that everyone can do. Let's gather some popsicle sticks and make reindeer!
I chose to paint my sticks brown, but you can leave them plain if you like.
 Supplies
3 popsicle sticks for each reindeer
brown paint
googly eyes
2 red pom poms
ribbon
green felt or construction paper for holly
Directions
I chose to paint my sticks brown, but you can leave them plain if you like.

3 popsicle sticks for each reindeer
brown paint
googly eyes
2 red pom poms
ribbon
green felt or construction paper for holly
Directions
- Paint sticks brown and let them dry (optional).
- Begin the reindeer ornament by placing a drop of glue on one end of the craft stick and add another one on top of it, in a V-shape. Then, glue one craft stick perpendicular to the V shape, about an inch from the ends. See photo below for help.
- Glue on the eyes, nose, and holly.
- Attach a piece of ribbon to the back to use as a hanger. You could also use this craft as a magnet just attach a magnet strip to the back.
- Hang on tree and enjoy!

Day 2: Salt Dough Ornaments
Making salt dough ornaments is so easy; you may already have everything you need in your home!

Dough Ornament Recipe
4 cups all-purpose flour
1 cup salt
1 1/2 cups warm water
-Preheat oven to 325 degrees F (165 degrees C).
-Mix flour and salt well. Gradually add water, stirring with a large spoon. Finish mixing with hands. Knead until soft and pliable.
-Roll out on floured surface about 1/8 inch thick. Cut shapes with cookie cutters. Place on cookie sheets. With a toothpick make a hole in the top of the ornament for threading string. Bake at 325 degrees F (165 degrees C) until hard, about 1 hour. Decorate with paint and varnish to preserve.

Dough Ornament Recipe
4 cups all-purpose flour
1 cup salt
1 1/2 cups warm water
Rolling pin
Cookie cutters
Toothpicks
Parchment paper
-Mix flour and salt well. Gradually add water, stirring with a large spoon. Finish mixing with hands. Knead until soft and pliable.
-Roll out on floured surface about 1/8 inch thick. Cut shapes with cookie cutters. Place on cookie sheets. With a toothpick make a hole in the top of the ornament for threading string. Bake at 325 degrees F (165 degrees C) until hard, about 1 hour. Decorate with paint and varnish to preserve.
Tuesday, December 6, 2011
Day 1: Glass Ball Ornaments

Glass Ball Ornaments are so beautiful! If you are afraid of your little ones breaking the glass, they now have plastic ones, that look like glass. This is a very simple but elegant ornament and I think you will love the many things that you can do with these. You can fill them with lightweight objects like:
- berries
- tinsel
- faux snow
- ribbon
- greenery
- paper
- candy
- I think a black & white picture would be classy!
Supplies:
- Glass ball or plastic ornaments, size(s) of your choice
- Small funnel, optional or rolled up piece of paper
- Fillings
- Ornament hooks (I personally like to use ribbon)
Instructions
- Take metal tops off ornaments and set aside.
- Carefully fill ornaments. Use a funnel or rolled up piece of paper to help guide the filling through the neck of the ornament, if desired.
- Replace the metal tops, then attach an ornament hook.
10 Days of Christmas Crafts

Today I am kicking off 10 Days of Christmas Crafts! What does that mean you ask? Well, for the next 10 weekdays, I will be posting a Christmas themed craft complete with a picture (always helpful), supply list, and directions. I've chosen crafts that are suited for children of all ages, that means adults to, so everyone can participate. Many of these projects would be perfect for a family FUN evening. So, get you glue and glitter, and join me as I get my Christmas craft on!
If you think about it, snap a picture of you and your craft, then send it to me, and I'll be sure to post it!
Thanks,
Sharmin
Thursday, December 1, 2011
Christmas Scripture Word Art Tree Printable
 |
| Christmas Scripture Word Art Tree |
I absolutely love decorating my home for Christmas, and any other occasion for that matter! Anyway, I really wanted some Christian Christmas art to add to my decor. I was going to create my own then I thought lets go to the web for inspiration. Well, low and behold I stumbled upon this blog A Simply Klassic Home, where Kristin created this word art scripture tree. The best part is she's allowing you to print it for free!! Yes and free means free here (y'all know free doesn't mean free without a catch anymore). So go and find a 8x10 frame, card stock or you could use regular paper, and a good spot to hang this beautiful piece of artwork!
Happy Decorating,
Sharmin
Subscribe to:
Posts (Atom)